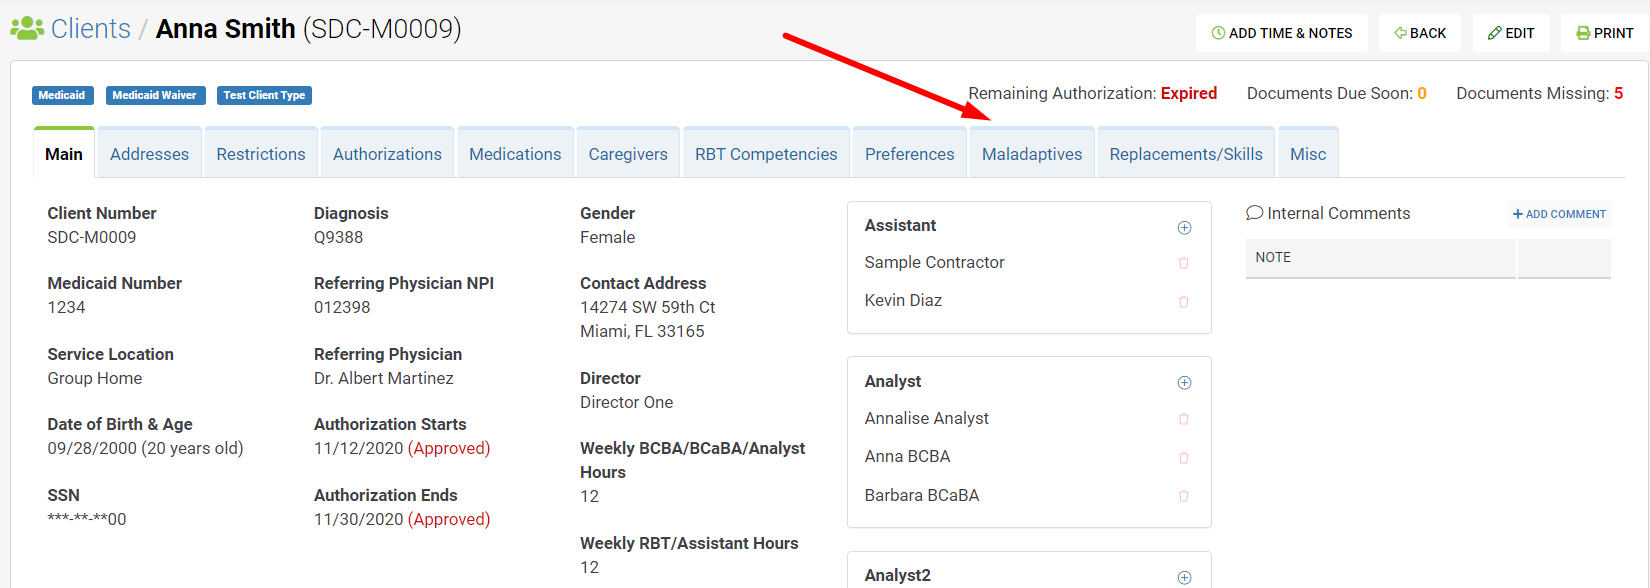
Exporting data from Behaviorsoft
![]()
Name: Exporting data from Behaviorsoft to Office Puzzle
Description: How to export data from Behaviorsoft and import it to Office Puzzle
Difficulty: Middle
Duration: Less than 10 minutes
Summary:
Exporting from Behaviorsoft
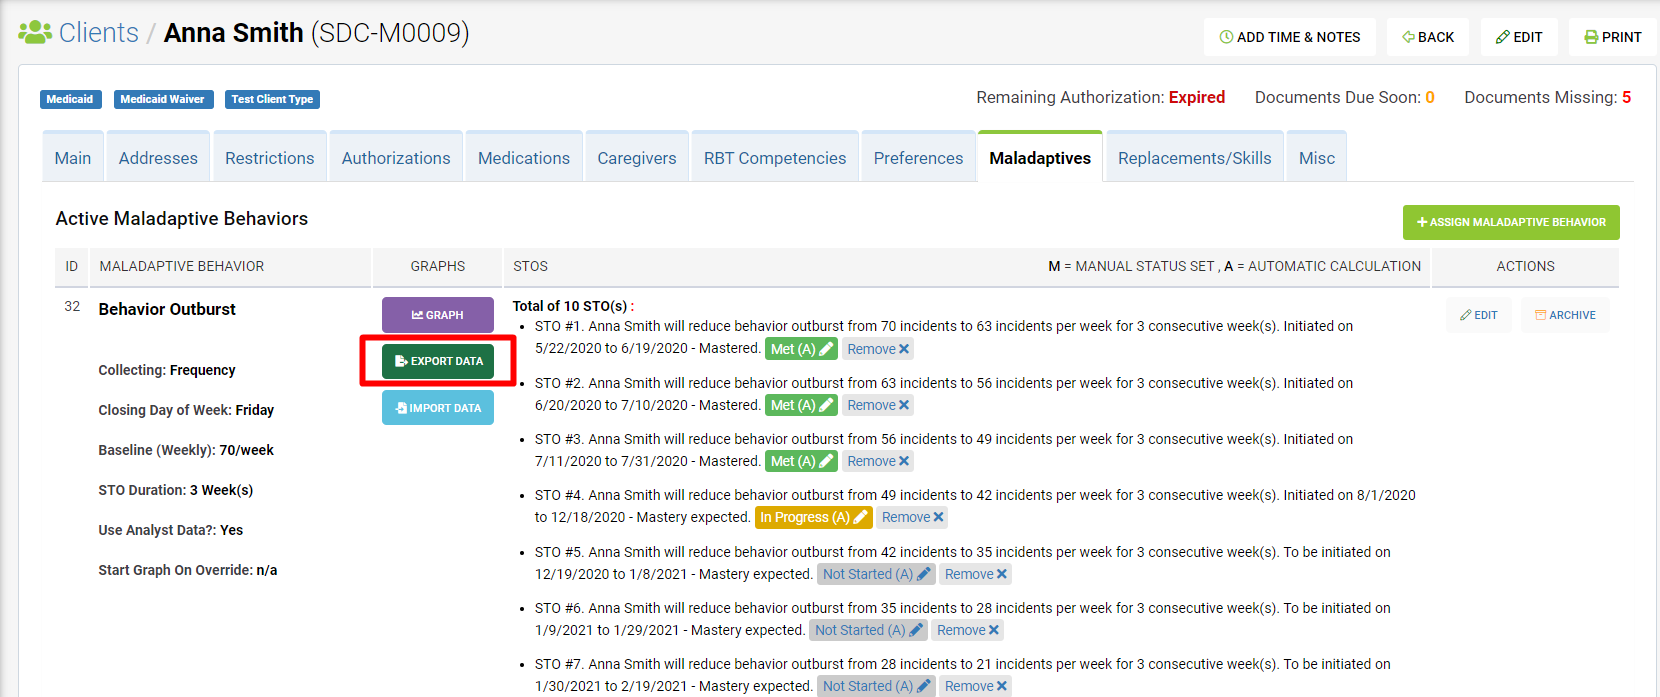
1. On the Client’s screen, click the Maladaptives tab or the Replacements/Skills tab.
2. Select the specific maladaptive behavior or replacement, and then click on the EXPORT DATA button under the GRAPHS column.
3. The EXPORT DATA pop-up screen will then appear.
4. Lastly, you can specifically choose to export data on specific dates. There is an option to enter a From Date and a To Date.
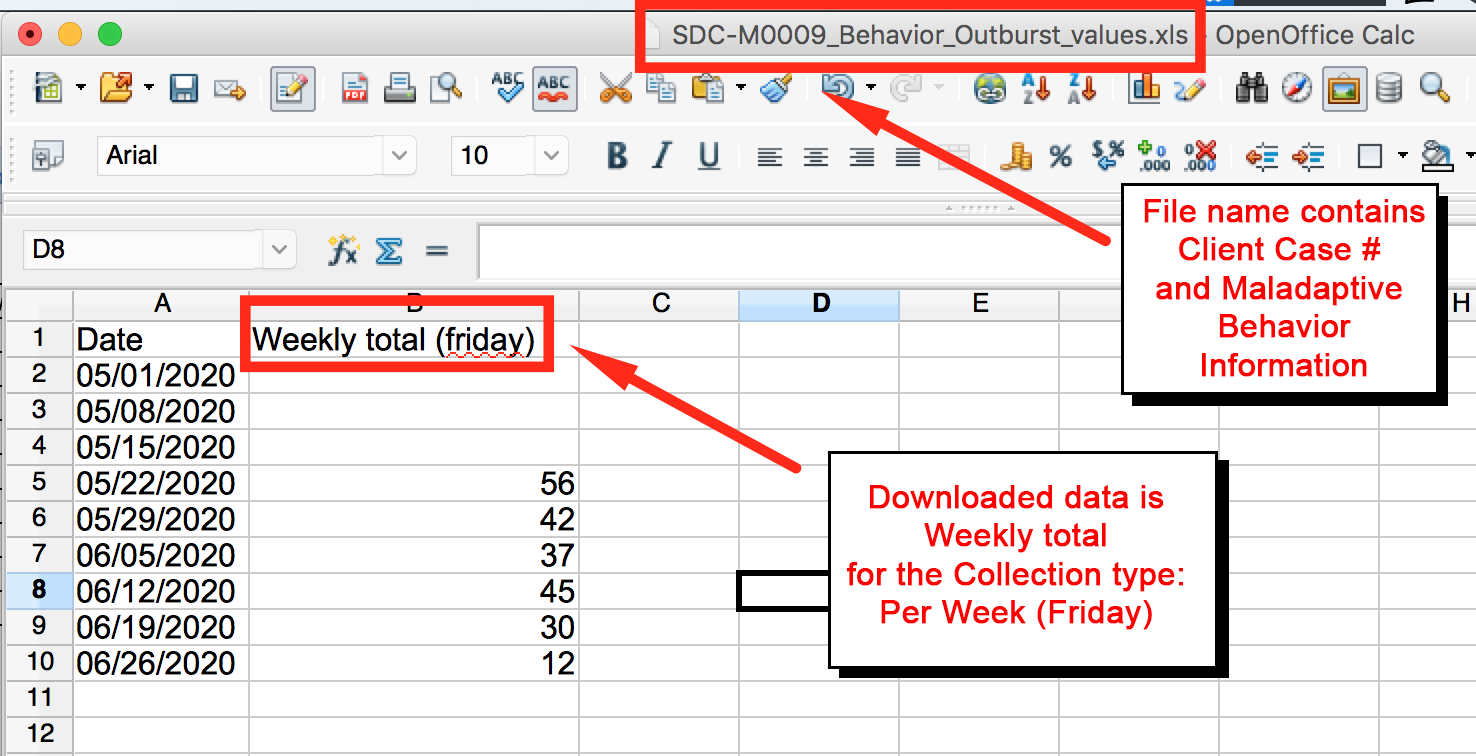
5. Once you have selected the Collection type and choose the specific dates, click Download Data. The data will then be exported in an Excel file.
Importing to Office Puzzle
6: Go to Client's Dashboard.
7: Click on the Service Plan button.
8: Click on ABA Therapy Service Plan.
9: Choose the required Category tab: Maladaptive Behaviors, Replacements, etc.
10. Click on the Edit button on the right side of the desired item.
11. Click on Imported Data tab.
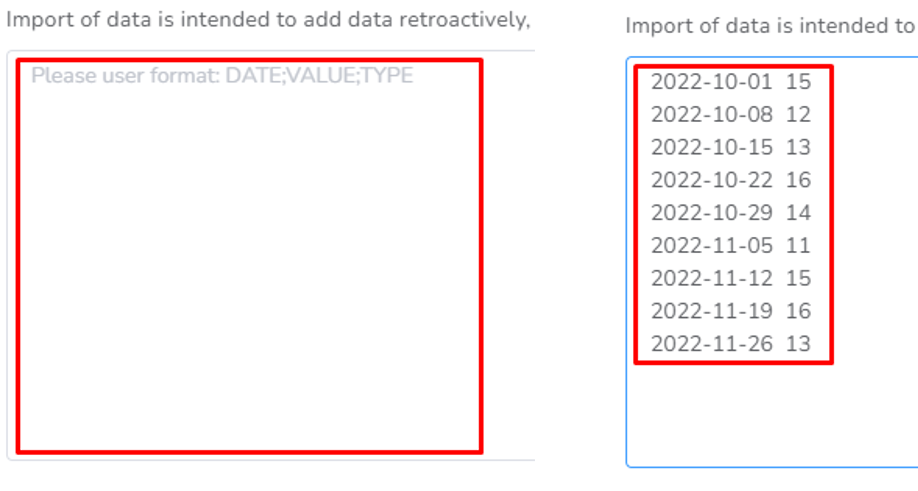
12. On the main box, you can paste the dates and values from the Excel file that you’ve exported from Behaviorsoft.
13. Once you’ve finished, click on Update.
Exporting client data from Behaviorsoft to Office Puzzle
Exporting from Behaviorsoft
Step 1: On the Client’s screen, click the Maladaptives tab or the Replacements/Skills tab.
 Step 2: Select the specific maladaptive behavior or replacement, and then click on the EXPORT DATA button under the GRAPHS column.
Step 3: The EXPORT DATA pop-up screen will then appear.
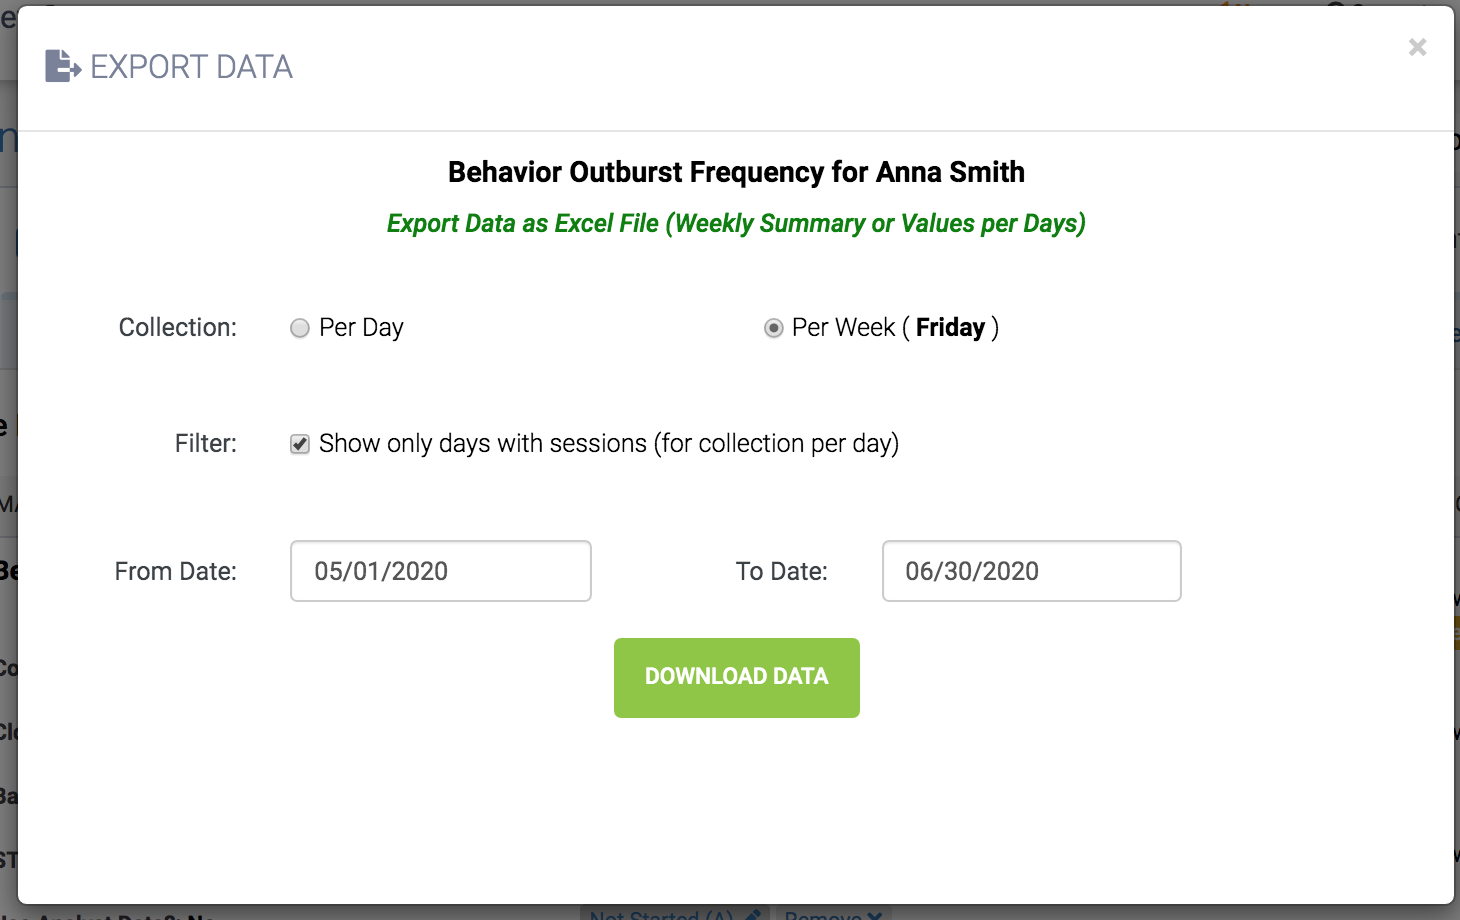
Step 4: Lastly, you can specifically choose to export data on specific dates. There is an option to enter a From Date and a To Date.
Step 5: Once you have selected the Collection type and choose the specific dates, click Download Data. The data will then be exported in an Excel file.
Importing to Office Puzzle
Step 6: Go to Client's Dashboard.

Step 7: Click on the Service Plan button.
Step 8: Click on ABA Therapy Service Plan.

Step 9: Choose the required Category tab: Maladaptive Behaviors, Replacements, etc.

Step 10: Click on the Edit button on the right side of the item.
![]()
Step 11: Click on Imported Data tab.
Step 12: On the main box, you can paste the dates and values from the Excel file that you’ve exported from Behaviorsoft.
Step 13: Click on Update.


Backup Client

Name: Backup Client
Description: How to create a full backup of a Client.
Difficulty: Easy
Duration: Less than 2 minutes
Summary:
1. Go to Client's Dashboard.
2. Click on Manage.
3. Click on the Backups tab.
4. Click on the Request Backup button.
5. Once the Backup is completed you will receive an email and the backup file will appear here for you to download.
Important Notes:
- This will backup all Documents associated with the client.
- You are responsible for the storage required for the data.
Backup Client
Step 1: Go to Client's Dashboard.
Step 2: Click on Manage.
Step 3: Click on the Backups tab.

Step 4: Click on the Request Backup button.

Step 5: Once the Backup is completed you will receive an email and the backup file will appear here for you to download.

After is done:


Create client event with EVV

Name: Create client event with EVV
Description: How to create an event/visit/session with EVV (Electronic Visit Verification)
Difficulty: Easy
Duration: Less than 2 minutes
Summary:
1. Go to Client's Dashboard.
2. Click on the Clock in button.
3. Fill in all the required fields.
4. Click on the Start Session button.
5. Now you can collect Data, capture Signatures, access linked Documents, etc.
6. Once the visit is over, click on the End button.
7. Fill in all the required fields. (including Signature if required)
8. Click on the End Session button.
Important Notes:
- You are recommended to use our Mobile APP on your cellphone since GPS coordinates are more accurate.
- If you don't see the Clock In button, your agency might have disabled this feature for you.
- If GPS coordinates are required by the agency the device used (Phone, Tablet, Laptop) will need to have GPS capabilities and permission granted to Office Puzzle.
- You can also create an event directly from the Calendar, but this will not include EVV information. Please click here for more details.
Create client event with EVV
Step 1: Go to Client's Dashboard.
Step 2: Click on the Clock in button.

Step 3: Fill in all the required fields.
Step 4: Click on the Start Session button.

Step 5: Now you can collect Data, capture Signatures, access linked Documents, etc.
You continue working for the duration of the session.
Step 6: Once the visit is over, click on the End button.

Step 7: Fill in all the required fields. (including Signature if required)
Step 8: Click on the End Session button.


Create client event from calendar

Name: Create client event from calendar
Description: How to create an event/visit/session from the Client's Calendar.
Difficulty: Easy
Duration: Less than 2 minutes
Summary:
1. Go to Client's Dashboard.
2. Click on the Calendar button.
3. Select the day when you want to create the event.
4. Fill in all the required fields. (including Signature if required)
5. Click on the Save/Save & Close button.
*** Please note, this will create all required documents linked to this event as well.
Create client event from calendar
Step 1: Go to Client's Dashboard.
Step 2: Click on the Calendar button.

Step 3: Select the day when you want to create the event.
Step 4: Fill in all the required fields. (including Signature if required)
Step 5: Click on the Save/Save & Close button.

https://www.youtube.com/watch?v=_KHb6d-mcvw